- How do I login to UF e-Learning?
Please go to the UF e-Learning website and click the orange Login to e-Learning button. You will be prompted for your GatorLink username and password.
If you experience any issues with your username and/or password, please contact the UF Computing Help Desk at 352-392-4357.
- How do I change my display name in Canvas?
Canvas uses the “Display Name” as set in myUFL. The Display Name is what you want people to see in the UF Directory, such as “Ally” instead of “Allison.”
To update your display name, use the following steps:
- Log in to one.ufl.edu, click on the profile icon in the upper-right portion of your screen, and select “View & Update Profile Information.”
- Click “Edit” on the right of the name panel, uncheck “Use my legal name”
- Under “Display Name,” update how you wish your name to be displayed, and click “Submit” at the bottom.
This change may take up to 24 hours to appear in Canvas.
- Where do I go for help with using UF e-Learning?
- If you are a student, contact the UF Computing Help Desk at 352-392-4357 or via e-mail at helpdesk@ufl.edu
- If you are an instructor, teaching assistant, facilitator, or other staff, please contact e-Learning Support at 352-392-4357 or via e-mail at learning-support@ufl.edu
- Which browsers are recommended for use with UF e-Learning?
UF e-Learning in Canvas supports the last two versions of every browser release. For more details, visit the Canvas Supported Browsers page.
Some supported browsers may still produce a banner stating "Your browser does not meet the minimum requirements for Canvas." If you have upgraded your browser but still see the warning banner, try logging out of Canvas and deleting your browser cookies. Please contact the UF Computing Help Desk at 352-392-4357 or via e-mail at helpdesk@ufl.edu if you need assistance.
- How do I create my course in UF e-Learning?
To request a Registrar Canvas course as a faculty member, instructors should use the "Canvas Course Request" module located in ONE.UF.
Support staff needing to request courses on behalf of faculty will need to request the course in the "Canvas Course Request- Admin" module of myUFL and will need the UF_SA_CANVAS_CRSE_REQUST_ADMIN security role.
Please see the Course Request Process guide for more detailed information.
- How do I import content from another course?
Instructors may import content from any course they are/were enrolled in as a teacher or facilitator. This can include assignments, modules, pages, discussions, quizzes, and more.
- To import all content from a Canvas course, you can follow this Canvas guide.
- If you prefer to choose which content to import, you can follow this Canvas guide.
- Are there workshops offered for instructors using UF e-Learning?
Yes! We offer several workshops to help instructors learn how to create effective learning spaces.
We also offer other workshop offerings periodically. Visit the UFIT Training website for more information.
- How do I add participants to my course?
For registrar courses, students will automatically be enrolled prior to the start of the term.
To add additional users to your courses, such as TAs and facilitators, please use the Manage Users tool located within Instructor Tools in the left-hand navigation panel. TAs and facilitators should be added to the INIT section unless you want to limit the TAs to a particular section, thus restricting their access to all students.
Additionally, you can manually create sections and add or remove people using the My Canvas Course Management tool in myUFL. Please see the Creating Sections How-To Guide for more information.
NOTE: These tools can be used to add TAs to specific sections or subsections. However, please keep in mind that UF Online TAs are still required to complete the TA Institute.
NOTE: It is possible to add students to the registrar sections of a course, however, when the roser is reconciled with the registrar, students who are not properly enrolled in the course will be automatically removed.
If you need additional assistance with getting users enrolled in your course site, contact e-Learning Support either by phone at 352-392-4357 or learning-support@ufl.edu.
- What participant roles are available in Canvas?
Canvas offers a variety of different roles with distinct permissions and capabilities to suit the needs of different users. Below is an overview of some common Canvas roles.
- Teacher - Instructors have full control over course content. They can create, modify, or delete course materials such as assignments and quizzes. Instructors can also modify course settings, grade and mange the gradebook, as well as communicate with students.
- Student - Students can access and interact with course content, submit assignments, attempt quizzes, participate in discussions, and view only their own grades.
- Teaching Assistance (TA) - identical to the teacher with the exceptions that they cannot manage enrollments and learning outcomes, and they cannot create new sections.
- Non-grading Assistant - Identical to TA with the exception that they do not have access to Grades, Outcomes, Managing Assignments/Quizzes, or Publishing the course. They will also NOT appear in the inbox under TAs.
- TA Grading Only - can view submissions, edit/moderate grades, and can message students
- Facilitator - identical to teacher
- Designer - can create all course content but cannot see student interactions, view/edit grades, or contact students
- Auditor - identical to the student
- Student Mentor - identical to a student with the exception that they cannot create collaborations
- Observer - can view course content but cannot interact with content or with students whom they are not linked to
- Program Observer - can view course announcements
- Guest Lecturer - can add files and pages, create conferences, and post to discussions
For a complete list of all Canvas roles and permissions, download the e-Learning Permissions chart. If you have any questions, please contact e-Learning Support at 352-392-4357 or learning-support@ufl.edu.
- How do I remove participants from my course?
If you need to remove participants from your course, please use the Manage Users tool located inside Instructor Tools in the left-hand navigation panel.
Additionally, you can manually remove participants using the My Canvas Course Management tool in myUFL.NOTE: It is possible to remove students from registrar sections of a course, however, when the roster is reconciled with the registrar, students who remain on the roster will be automatically re-enrolled.
If you need additional assistance with removing users from your course site, please contact e-Learning Support at 352-392-4357 or learning-support@ufl.edu.
- What are the differences in the three TA Roles?
There are three roles to choose from for a TA in an e-Learning course.
- TA – has the same permissions as the instructor with the exception of managing outcomes.
- TA Grading Only – can access the gradebook (and SpeedGrader) and enter grades; however, they cannot do things like post announcements, edit assignments or quizzes, edit wiki pages, or upload materials to Files.
- Non-Grading Assistant – Identical to TA with the exception that they do not have access to Grades, Outcomes, Managing Assignments/Quizzes, or Publishing the course. They will also NOT appear in the inbox under TAs.
These classifications came about because some instructors did not want TAs to grade course work or because they had undergraduate TAs that are not allowed to see their fellow undergraduate’s’ grades (Non-Grading Assistant). Other instructors did not want TAs to be able to edit assignments or quizzes or pages within their course, only grade the assignments (TA Grading Only).
If you have any questions about which role your TA should have, please call e-Learning support at 352-392-4357 or learning-support@ufl.edu.
- How do I limit my TAs to grade only specific students?
If you have two TAs in a course and want them to grade only specific students, you may want to create two non-registrar sections called, for instance, "TA Bob" and "TA Jane". You would then add Bob and the students that you want Bob to grade to his section and then add Jane and the students you want Jane to grade in her section. Please see My Canvas Course Management: Creating Sections How-To Guide for more information on how to create sections for Bob, Jane, and their students. In addition, please see My Canvas Course Management: Adding and Removing Participants for information on adding students to Bob and Jane’s sections.
If you need additional assistance with adding users to your course site, please contact e-Learning Support either by phone at 352-392-4357 or by email at learning-support@ufl.edu.
- How do I publish a course in e-Learning?
Newly created Canvas courses are always initially unpublished and students are not able to view unpublished courses. When you are ready to publish your course, you can do so in two ways:
- Directly from your Canvas Dashboard by locating the Unpublished Courses section near the bottom and selecting the Publish button for the appropriate course.
- From the course Home Page, the Course Status dropdown menu displays in the upper right-hand corner. Select the dropdown menu and click Publish.
- Can I use Turnitin in UF e-Learning?
You can access Turnitin from within your courses in two ways - using the Turnitin external tool or by selecting "Turnitin" from the drop-down menu called "Plagiarism Review" in an assignment on Canvas. The following tutorials will show you how to use Turnitin external tool as instructors and students.
Instructors:
How to Set Up a Turnitin External Tool Assignment
How to View and Grade a Turnitin External Tool AssignmentStudents:
How to Submit a Turnitin External Tool Assignment
How to Access a Graded Turnitin External Tool AssignmentIf you need additional assistance with Turnitin Assignment settings, please contact e-Learning Support either by phone at 352-392-4357 option 3 or by email at learning-support@ufl.edu.
- How do I set up a Peer Review assignment in e-Learning?
Instructors:
How to Create a Peer Review Assignment in e-LearningStudents:
How to Submit a Peer Review to an Assignment
How to Access the Review of Your Peer Review Assignment- How do I set up a Peer Review assignment in Turnitin External Tool?
Instructors:
How to Create a Peer Review Assignment in Turnitin External ToolStudents:
How to Review a PeerMark Assignment in Turnitin External Tool
How to Access the Review of Your Peer Review Assignment in Turnitin PeerMark- What do I need to do to close out my course at the end of the semester?
Your course will close automatically at the end of the semester based on the default semester end dates. If you need to adjust this date to leave your course open longer, you can make the adjustment from the Canvas left-hand navigation:
- Click Settings
- Go to the Course Details tab
- Change Participation to "Course"
- Enter the “Ends” date
- Click Update Course Details at the bottom of the page
You can also view the Canvas Guide on updating participation settings in your course. If you need additional assistance, please contact e-Learning Support either by phone at 352-392-4357 option 3 or by email at learning-support@ufl.edu.
- How do I submit my final grades to myUFL?
How to Upload Final Grades:
For more information regarding the final grade submission process, please visit the HR Toolkit on Grades.
If you have questions or need additional assistance, please contact your departmental grades coordinator or e-Learning Support either by phone at 352-392-4357 option 3 or by email at learning-support@ufl.edu.
- How do I give special access to an assessment?
You can allow an individual student, several students or the entire class to have extra attempts or additional time on a quiz. Granting extra time or attempts is achieved through "Moderate This Quiz".
For more information on how to grant special access, please review the Moderate Quiz Guide.
Additionally, you can adjust the accomodations for all of the quizzes in a course for multiple students at a time through the Quiz Extension tool. For more information, please visit our FAQ on the Quiz Extension tool.
If you have questions or need additional assistance regarding Quiz settings, please contact e-Learning Support either by phone at 352-392-4357 option 3 or by email at learning-support@ufl.edu.
- How do I give a different due date for some students in quizzes and assignments?
Availability and due dates for quizzes and assignments default to "everyone" in the course; however, you are able to give different dates to specific students and/or sections. You can follow the Differentiated Assignments Guide for instructions.
- How do I add my Syllabus?
For information on how to add your syllabus, please review the Canvas Syllabus Guide.
Editing the Syllabus allows you to add text and link files, images, and other course content in your Syllabus Description. You can also choose to disable the Course Summary.
The Course Summary is enabled by default. It is automatically generated based on assignments and events within a course. Items within the Course Summary can only be changed by editing or deleting the assignments or events. All assignments (unpublished and published) are listed in the syllabus for instructors.
To disable the Course Summary, uncheck the Show Course Summary checkbox.
If you'd like for your syllabus page to only contain a downloadable syllabus file, you should use a Page, which will allow you to add the same content types without the assignment list. If you decide you want to use a page instead of the syllabus tool, it is recommended that you remove the syllabus tool from the left-hand navigation pane.
- How do I use the Scanning Services Web App?
If you are utilizing Scanning Services, you will receive an e-mail containing the link to the Scanning Services portal. Here you will be able to obtain your output .zip file. Your .zip file will contain a no_match.txt file and a .csv file. Within the Scanning Services portal you will see the following:
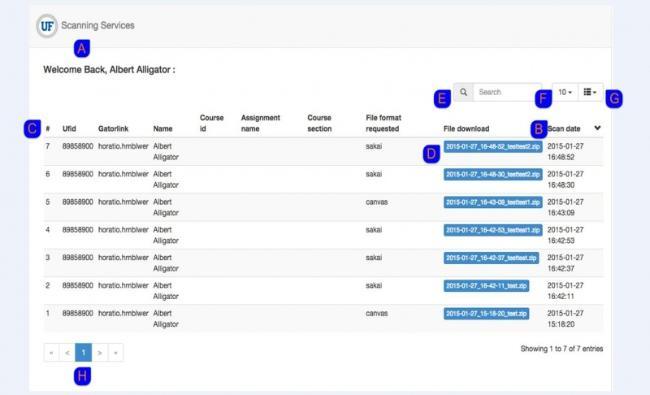
a. Your scanning services tab will show your available downloads
b. Your scans by default will be listed in chronological order starting with the most recent scans.
c. Clicking on any of the headers (except file download) will sort the table according to the clicked header.
d. To download your .zip file click on the file name in the file download column.
e. The search box will search the whole table for the inputted value.
f. The number of items included in the table may be increased by selecting a larger number located in the drop-down menu directly to the right of the search box.
g. The 2nd button to the right of the search box is the place where you can hide different table columns.
h. At the bottom of the page, you will find buttons that will move you to the next page.
- How do I upload Scantron data into e-Learning?
Your grade files will be available in your Canvas course files in the form of a .zip file (containing: *_[COURSENAME]*.csv, *no_match.txt, *student_not_in_class.txt). This will be a locked folder (not visible to students) entitled "scanning_services." You can then import these grades into your gradebook with the following instructions:
- Download and unzip your output files from Scanning Services.
- In your Canvas course, within Grades, select "Import" and then "Browse."
- Select the .csv file you received from Scanning Services and click "Upload Data."
- Canvas will prompt you to either select an existing column in Grades or create a new one. If you enter a new one, it will ask the point possible for that item. When done, click "Continue."
- Canvas will present a list of students and their scores for you to check. Any problem rows will display here for troubleshooting. If all is correct, click "Save Changes."
If you have questions or need additional assistance regarding importing Scantron grades, please contact e-Learning Support either by phone at 352-392-4357 option 3 or by email at learning-support@ufl.edu.
- How do I access Groups in e-Learning? (Students)
If you are assigned a group in e-Learning, this video tutorial will show you how to locate your groups and visit the group page.
Accessing Groups in e-Learning
- What is the UF Photo Roster tool?
UF Photo Roster allows instructors to view their roster in their course(s) on Canvas, but also includes images of their students. These images are not the Canvas profile pictures, but instead, they are from Gator1 Central. Photo Roster also allows instructors to view their student’s UF email address so that they can contact students outside of the Canvas email system.
UF Photo Roster can be accessed from within your course by navigating to Instructor Tools on the left navigation menu.
- Why do some of my students not have photos in UF Photo Roster?
In some cases, students do not have official photos within the Gator1 Central database. The main reason for these cases is that the students are distance education students or are UF online students.
- When to Limit Participants to a Section
A common problem at the beginning of a term is that instructors/TAs/Facilitators notify us that they cannot see the students in their course. This is often because whoever enrolled them chose “limit to section” during the enrollment process. They are appropriately enrolled in the INIT section, but then limited to that section. Typically only teacher-type roles are in the INIT section so the students in the registrar sections are off-limits to the person who is limited to the INIT section.
It is rare that you would limit someone to a section. If in doubt, don’t!
The only reason to limit someone to a section is if you are purposely trying to make sure that person only sees certain students in the course and not others, for example, if you want a TA to only be able to grade specific students. In that case, you'd have to manually create a section, put the students and the TA in it and limit the TA to the section. Students would be in their registrar section AND in the section you created. You would also need to enroll the TA to the INIT section and limit to that section as well, or you won't be able to communicate with that TA!
- How do I copy myself on Emails and Announcements?
Have you ever wondered if the email that you sent your course via e-Learning was sent? What about if an announcement you posted was sent to students via email?
To get copied on any emails you send to your class, go to Account, then Notifications (on the left-hand navigation on blue bar). Under Conversations choose the checkmark next to Conversations Created by Me to be notified right away.
To get copied on announcements, go under Course Activities on this same page and choose the checkmark next to Announcement Created By You.
Now, when you send an email or post an announcement to your class via e-Learning, you will receive an email notification that they went out.
If you have any other questions, please contact e-Learning Support at 352-392-4357 or learning-support@ufl.edu.
- How do I message students from the Gradebook?
When using “Message Students Who ...” in the gradebook, your choices are:
- Scored more than…
- Scored less than…
- Haven't submitted
- Haven't been graded yet
The subject line of the email that is sent to the students will include that verbiage. For example, if you want to email students who made less than 60 on Exam 1, the subject line is “Scored less than 60 on Exam 1.” Students may be uncomfortable with receiving an email with that subject line.
To avoid any semblance of revealing grades, it is recommended that you edit this subject line before sending the message. The messages are sent to the students individually, so they are not aware that others may have received the same message.
If you have any questions, please contact e-Learning Support at 352-392-4357 or learning-support@ufl.edu.
- How do I create self sign-up groups?
For instructions on how to create self sign-up groups in Canvas, you can view the Canvas Guide.
Please Note: If you are creating self sign-up groups, be sure to give the students a deadline to sign up for the group. Once this deadline passes, unclick the self sign-up box (under the button with three vertical dots next to the "+ Group" button, click Edit).
If not, students can move around from group to group, which will create problems when assigning groups to a graded activity such as assignments or discussions.
If you have any questions, please contact e-Learning Support at 352-392-4357 or learning-support@ufl.edu.
- Determining Which Quiz Banks are Associated with Which Quizzes in a Closed Course
In a current course, an instructor would go to a quiz, click on Edit, and see which question banks were associated with that quiz. However, in a closed course, the Edit button is removed.
To see which quiz banks are associated with a quiz in a past enrollments course, go to the quiz and click "See Full Quiz" located under "Related Items" (on the right). The quiz banks that are associated with that quiz will be listed there.
If you have any questions, please contact e-Learning Support at 352-392-4357 or learning-support@ufl.edu.
- Why is Speedgrader not displaying submissions for my group discussion?
Need to create a group discussion? Make sure you select a Group Set that already has students sorted into their groups.
If students are not sorted into groups, SpeedGrader will not show the students’ submissions for a group discussion but will instead give you a message that you have to view the full discussion.
For more information about how to create groups, please see the Canvas guide. You will also find information about how to create a group discussion in this Canvas guide.
If you have any other questions about these processes, please contact e-Learning Support at 352-392-4357 or learning-support@ufl.edu.
- How do I use Course Reserves in Canvas?
Activating the Course Reserves link in Canvas automatically creates a course in Ares. If you have a previous course and have listings in Ares that you need to transfer to a new course shell, or if you experience any other problems, contact the Course Reserves Unit at 352-273-2520, or via email at eres@uflib.ufl.edu. You can also find more information about activating and using Course Reserves in Canvas by viewing the Course Reserves site.
- How do I import a CSV file to Gradebook?
It is possible to import a CSV file of grades into the Canvas gradebook so students can more easily view their scores. You can view the Canvas Guide for step-by-step instructions on importing your CSV file.
Please Note: When importing a CSV file into the e-Learning course gradebook, if the words 'Current Score,' 'Current Points,' 'Final Score,' or 'Final Grade' are part of the assignment name, the CSV file will not upload, and you will get an error message that no changes were made in the gradebook. To work around this limitation, please avoid using those words either by themselves or in combination with other words (i.e. Exam 1 Final Grade), or if you must use them, make them lower case (i.e. Exam 1 final grade).
If you have any questions, please contact e-Learning Support at 352-392-4357 or learning-support@ufl.edu.
- How do I create a Bonus Question in an online quiz?
If you have an online quiz in which you want to add a bonus question, and the bonus question is one that will be graded by canvas (i.e. multiple choice, fill in the blank, True/False, etc.), create the question and set it to the number of bonus points you want the student to have if they answer it correctly. Once all students have taken the quiz, edit the quiz and make that bonus question worth 0 points. The point value awarded to the student will not change, only the total point value of the quiz itself will change (decreased by the number of bonus points you set the question for).
For example, you have a quiz that you want worth 50 points. You want to give your students a bonus question that will be graded automatically by canvas and is worth 2 points. You add that bonus quiz question. Now the quiz is worth 52 points. When all the students have taken the quiz, edit the quiz again and set the bonus question to 0 points. Now the quiz will be worth 50 points and any bonus points earned are still calculated (in effect a student could make 52 out of 50 on the quiz).
If your bonus question requires manual grading (i.e. essay, short answer, etc.), go ahead and set it to 0. Any points you award to that question above 0 will be calculated as bonus points.
If you have any questions, please contact e-Learning Support at 352-392-4357 or learning-support@ufl.edu.
- How do I regrade quiz questions?
Have you ever had the need to re-grade a quiz? Canvas currently supports an automated re-grade option on three different question types:
- Multiple Choice
- True/False
- Multiple Answers
In addition, when correcting quiz questions or answers for regrade, you need to allow at least 10 minutes before making any additional changes to other quiz questions or answers. Otherwise, the regrading process is interrupted and you will need to manually regrade the quiz question/answers instead.
For all other question types, you will need to manually re-grade any questions that have changed. More information on re-grading quizzes can be found on this Canvas Guide.
If you have any questions, please contact e-Learning Support at 352-392-4357 or learning-support@ufl.edu.
- Re-Enrolling Students into Groups when they are Re-Enrolled in a Course
If you are using groups in your course, and a student gets dropped from the course by the Registrar, they are also dropped from their group. However, when the student is re-enrolled in the course, they are not automatically reinstated into their course group(s). The instructor must re-add the student to his/her group again.
If you have any questions, please contact e-Learning Support at 352-392-4357 or learning-support@ufl.edu.
- Sending Email Attachments to People in your e-Learning Course
Are you sending an attachment in response to a student email in e-Learning from your email client (such as outlook)? This attachment will be stripped from the email once it enters e-Learning as a security measure in place by Instructure Canvas. To make sure that your students are receiving attachments that you send them, send the email with the attachment through the e-Learning Inbox tool. If you have any questions, please contact e-Learning Support at 352-392-4357 or learning-support@ufl.edu.
- Correcting Paper Icons in the Gradebook
Your gradebook in Canvas will display a Paper Icon to indicate that an item needs to be graded. There are a number of conditions that cause this icon to appear:
- Submission has not been graded
- Quiz has not been fully graded, such as with manually graded question types.
- Resubmission has been made
- Grade has been removed by instructor
Because any ungraded assignments become zeros during grade finalization, we strongly recommend resolving any Paper Icons in your Canvas gradebook before finalizing your grades to ensure the grade your students receive matches what is displayed for them in Canvas.
If you have any questions, please contact e-Learning Support at 352-392-4357 or learning-support@ufl.edu.
- How can I delete or modify a calendar item?
Sometimes you may need to edit the date of an event or assignment in your course. This can be done one of two ways:
- Click on a calendar event and select edit to modify the date.
- Drag and drop the item to a new date.
- Caution: If you delete an event or assignment from your Calendar, it also completely deletes that associated content from your course. Be careful that you don't accidentally delete important items (like quizzes or assignments).
If you have any questions, please contact e-Learning Support at 352-392-4357 or learning-support@ufl.edu.
- Quiz Statistics in Large Courses
The display of quiz statistics currently has a limit of 10,000 data points. After the 10,000 mark, the quiz statistics display will not load. For example, if you have a course with 300 students and they are taking an exam with 50 questions, that is 15,000 data points. You will not be able to view the quiz statistics in the browser, though you can still download the excel spreadsheet. We have also found that if you are close to that 10,000 point threshold (e.g. over 9,000), quiz statistics may intermittently not load.
The workaround is to view quiz data by sections (i.e. filter section) so that the data points being displayed fall under the 10,000 point threshold. Additionally, if you have one large section in your course, you may want to create sections in myUFL and add students to them to view quiz statistics.
If you have any other questions, please contact e-Learning Support at 352-392-4357, option 3.
- Let Students See Quiz Responses Only Once After Submission
It is recommended that if you want to let students see their quiz responses after taking the quiz, you wait to check the box that says "Let Students See Their Quiz Responses" until all quizzes are taken. However, if you leave this box checked, students will see the quiz questions and responses even after the semester ends.
To stop this and still give students a chance to see their quiz responses, you can manually uncheck the box at the end of the semester OR click the box that says "Only once after each attempt." With the latter option, if you give a student only 1 attempt at a quiz, they can see their quiz responses (and the quiz questions) once, and then it is locked.
- What Quiz information do students have access to after the semester ends?
- If you leave the box checked for "Let Students See Their Quiz Responses," then they will be able to see the quiz questions and their answers after the end of the semester even when the course moves to Past Enrollments (under Courses).
- If you also leave the box checked for "Let Students See The Correct Answers"(without a close date), then they will also be able to see the correct answers when the course moves to Past Enrollments.
- If you put in a close date for viewing correct answers, they will not see the correct answers after that date, but they will be able to see the quiz questions and their answers even when the course moves to Past Enrollments.
- If you uncheck the box for "Let Students See Their Quiz Responses" at the end of the semester or review period, then they will not be able to see the quiz questions or their answers. They will only be able to see their quiz grade. This is best practice if you prefer not to have the potential of tests being shared between semesters.
- Alternatively, you can choose to override the term availability settings and put the beginning date as the beginning of the semester and the end date the Friday after grades are due. Be sure to switch "Participation" to "Course" and enter the availability dates you wish to use.
If you have any questions, please contact e-Learning Support at 352-392-4357 or learning-support@ufl.edu.
- What course content do students have access to after the semester ends?
By default, courses are set up so that students can view their work (e.g. what they submitted for an assignment or a discussion). In addition, students can see materials posted in a course (such as lectures and files) that were made available to them during the course.
If you do not want your students to have access to your course at all after the end of the semester:
- Go to "Settings"
- Under the "Course Details" tab
- Choose "Restrict students from viewing course after end date"
- Click "Update Course Details"
If you want them to be able to access the course but do not want them to have access to things like files, lectures, assignments, or discussions, you can restrict the student navigation:
- Go to "Settings"
- Click on the "Navigation" tab at the top of your screen
- Remove the items from course navigation that you do not want students to access after the semester by dragging items under "Drag items here to hide them from students" or clicking the 3 dots to the right and choosing "Disable" from the dropdown menu
- Click "Save"
If you have any questions, please contact e-Learning Support at 352-392-4357 or learning-support@ufl.edu.
- Dashes in the Gradebook
Dashes in your Canvas gradebook indicate that those assignments have not been graded yet, and do not contribute toward the grade shown in the "Total" column.
Best management practice is to enter a grade for each assignment or "EX" if the assignment is excused for the student. This way, the grade the student sees is a true reflection of what they will receive.
If you have any other questions, please contact e-Learning Support at 352-392-4357 or learning-support@ufl.edu.
- How do I know what sections I am teaching?
If you are unsure which sections you are teaching for your upcoming course, please go to ONE.UF and log in (if prompted). Under the Course Mgmt tile, choose Class Rolls. You can see the courses you are teaching and the section numbers associated with the course there.
If you have any questions, please contact e-Learning Support at 352-392-4357 or learning-support@ufl.edu.
- How Do I use the Quiz Extension Tool?
The Quiz Extension Tool can be used to allow additional time for one or more students on quizzes throughout an entire course, rather than applying accommodations to each quiz individually.
For information on how to use the Quiz Extension Tool, please view the Quiz Extension page as well as the tutorial for using the tool.
- How do I prepare my gradebook for One UF?
This guide will show you how to prepare your gradebook for submitting to One UF to ensure that the Canvas grade matches the final grade.